The vNetwork Distributed Switch (vDS) is an amazing new entity in the vSphere realm. As with many things, knowing a little history makes you appreciate things a little more.
A Little History of vDS
A long time ago, vSphere environments relied upon each ESX host being configured with multiple virtual switches. These switches were bound to physical NICs that bridged the virtual and the physical networks. However, as the switches needed to be defined on each host, there was room for error. vMotion relies upon the same switch names to be defined on each ESX host, or else it will fail. Additionally, it was darn near impossible to collect any networking information regarding how a VM was using a switch because the VM could be on any given switch at any time.
So, VMware saw the inefficiencies of this structure and began seeing the benefits of a more centralized virtual switching infrastructure. Enter the vNetwork Distributed Switch (vDS). The vDS removes the need to create virtual switches on the ESX/ESXi host and, instead, creates the switch on the data center. So, any machine inside of the datacenter has access to the virtual switch. Now, all the administrator needs to do is assign the correct physical NICs to the correct switches, and the work is done for you.
The vDS is also the cornerstone for some of the new networking functionality that VMware is introducing (vShield products, vCloud, etc…). vDS introduces the ability to add logic and control to the switching of the virtual machines. Naming standards are applied across all hosts to ensure that machines will migrate flawlessly. Network statistics on a VM are maintained as they are running on the same switching entity, regardless of ESX host. New functions, like Network I/O Control can be introduced (ability to prioritize which VMs have network access). Again, this is the future of how VMware is going to handle vSphere networking. So, getting on the horse now is going to be beneficial as you will be more likely to be able to use new features and functions sooner in the future.
How To Reconfigure Virtual Networking While Keeping VMs Live
Now, if you are like me, all of the NICs in our vSphere environment are being consumed. This poses a problem because we need at least 1 vmnic to connect to the vDS in order for it to become useful, right?! Plus, being able to migrate the VMs without any downtime seems like a swell proposition as well. So, I have developed what I believe to be a fairly simple procedure that should allow for us to reconfigure the virtual networking while keeping the VMs live, without needing to vMotion everything off to another host… just a little repetitive and requires a little balancing. But, that just makes it more fun! The instructions are going to assume using the GUI to define the vDS.
Stage 0 — Define the Physical Network Adjustments
The underlying physical network needs to be configured properly for this to work. This may be a great opportunity to make some adjustment to the networking that you have always wanted to make. For me, I am taking the opportunity to move everything over to trunking ports, so the vDS is going to tag the VLANs as necessary. Just remember that you are going to need to make sure any pSwitch adjustments you are going to make ahead of time are not going to impact the production network. This may take some coordination with your networking team. If you, like me, are the networking team, this conversation should be nice and quick. Just make sure everyone is on the same page before starting.
Stage 1 — Define the vDS
This is super easy. You can define the vDS objects without interrupting anything. Part of the GUI setup asks if you would like to add physical interfaces now or later. Just select the option to add later and move on with the setup.
Next up, right-click on your Datacenter and select “New vNetwork Distributed Switch”
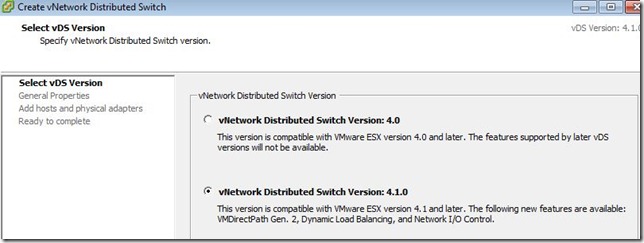
Assuming you are running vCenter 4.1 (with at least 1 ESX 4.1 host), you should have the option between version 4.0 and 4.1.
Selection version 4.1.0 is going to be the most preferable as it introduces support for the most new functions. On the down side, you need to be running ESX/ESXi 4.1 to get the functionality. For this example, we will assume you are running on ESX/ESXi 4.1.
The next step involves giving the vDS a name. Name the switch something descriptive that would allow you to know exactly which network it connects to just by the name. So, dvSwitch-DMZ would be a good name, for example. Additionally, you can define the number of dvUplinks (vmnics) will connect to the switch (per host). The default value of 4 is just fine for our environment, so select it and move on.
The next step allows you to select the vmnics from each host that meets the vDS configurations. So, if you have a single 4.1 host in your environment and your environment has 10 ESX hosts, you will only have a single host in this list. Recall that we selected vDS 4.1.0 above… and 4.1.0 requires ESX/ESXi 4.1. For the time being, we are going to select the option to “Add Later” and move on.
The final stage allows for the creation of a default port group and to finish. In this situation, we will go ahead and allow the wizard to create the port group automatically and create the vDS!
Stage 2 — Remove One vmnic From Existing vSwitch
Seeing as all of the vmnics are consumed, we need at least one vmnic available to move to the new vDS. Now… take into consideration the network changes that you may need to make for the vDS (back in Stage 0). You may need to coordinate the switch port change with the network team (or yourself). Now… as we are removing a vmnic from your production environment, you are responsible for double-checking to make sure that this should work for what you are doing. If you have a vSwitch with a single vmnic, you WILL lose connectivity when you pull the vmnic for the vDS.
Once you know which vmnic you are going to remove from the existing vSwitch for the new vDS and you have cleared it with your networking team, go ahead and remove it from the vSwitch via the vSphere Client.
Stage 3 — Add the vmnic to the new vDS
Now that you have a vmnic available to use, ensure it has been properly configured for the network (again, see Stage 0).
The next step is to add the vmnic to the vDS. Since we did not assign any ports to the vDS during creation, we need to add the ports from the ESX/ESXi host itself.
Open the host configuration tab —> Networking —> Click on the “vNetwork Distributed Switch” button
This view will show you the configuration of the vDS on the ESX/ESXi host itself.
Click the “Manage Physical Adapters” link on the top-right corner of the screen. This will load a page that displays the vmnics attached to the vDS. Select the “Click to Add NIC” link.
Locate the section labeled “Unclaimed adapters”. Inside the section, you should see the vmnic you just removed in Stage 2! Sweet!
Select the adapter and click OK.
You have been returned to the “Manage Physical Adapters” screen again. This time, you should see that the vmnic has been added. In my environment, this is vmnic2.
Stage 4 — Configure the Port Group VLAN
The Port Group is a structure inside of the vDS that handles many of the switching functions you would expect. These functions include Traffic Shaping, Failover, VLAN, etc… This is semi-analogous to the vSwitch you were used to configuring in the past.
In the event that you need the vDS to tag your network traffic with the proper VLAN, you need to edit the Port Group settings.
Locate the vDS in your vCenter structure. Click the [+] next to the vDS to get access to the Port Group (default label is “dvPortGroup”). Right-click on the Port Group and edit the settings.
Locate “VLAN” in the table on the left. Notice the “VLAN Type” defaults to “None”. Drop the box down and select “VLAN”. Then, provide the VLAN ID.
Click OK to close out the windows.
Now, your Port Group is on VLAN 30!
Stage 5 — Move A VM To vDS
Next stop is the time to test your work. Find a nice utility or low-use VM. You should be able to ping the VM continuously as you move from the old vSwitch to the vDS. So, begin pinging the VM.
Now, we need to change the network that the VM’s NIC is connected to. This is a simple operation you can perform on the fly, while the machine is online.
Edit the settings of the VM.
Select the Network Adapter of the VM
On the right-side of the window, you will see a section labeled “Network Connection”. Look for the Network Label box and drop it down. Magically, you will see your new vDS as a network label. Select the vDS
Hold your breath and click OK. See… that was not hard was it?! Pings should continue uninterrupted. Now… if you have any connectivity issues to the VM, I would suggest the following:
- Move the VM back to the original Network (select the old Network Label from the Network Connection section of the VM Settings)
- Check to ensure the proper pSwitch port has been configured correctly. Do you need a trunk? Is it configured as a trunk? Was the correct port configured (oops)?
- Check to ensure you have defined the VLAN in the Port Group correctly, if you are trunking.
- Try again once everything has been verified.
Stage 6 — Balancing Act
If you have made it this far, you know that the vDS is setup as you expected. The underlying vmnic has been configured properly to allow access to the network for the VMs.
So, the next step is going to be a balancing act. You will need to migrate your VM network adapters from the old vSwitch to the new vDS. As the load on the vDS gets higher, you will need to migrate another vmnic from the vSwitch to the vDS. Ultimately, all VMs will need to be migrated before the last vmnic is removed. Otherwise, the VMs on the vSwitch will be lost in their own network-less world until you move them over.
Rinse-Wash-Repeat
Stage 7 — vBeers
Test everything out. The networking for the VMs should not be interrupted. After the balancing act has been completed, the VMs on the host should be safely running on the new vDS! Complete the same tasks on your other ESX/ESXi hosts (again, remember that we need them to be on v4.1, right?!).
Well done. You deserve to have some vBeers for your hard work!
Notes and Considerations
- You are the master of your environment. The example above is just that… an example. You know what is best for your environment. Take everything you read here with a grain of salt.
- By all means, you can feel free to shutdown VMs to change any configuration if you feel more comfortable going that route. The same procedure applies. With less concern about the VM availability since you know it is going to be offline anyway.
- Migrating VMs to a vDS will interrupt any vMotion activities until other hosts have been configured (recall that each ESX/ESXi host needs the same Networks to be available for the migration to complete). So, while this can be performed live, selecting a maintenance window for the work would still be wise.
- If you have the capacity in your environment, you can always evacuate all VMs from a host and configure it without any VMs running as a safety measure. In that environment, you do not need to worry about a balancing act as you will not have any production load on either the vSwitch or the vDS. The same configuration principles apply.
Thanks for reading through this walkthrough on implementing a vDS on a live system! Look for future posts on migrating VMkernel interfaces to vDS configurations and how Host Profiles can help make this easier for you.
As always, please leave comments at the bottom. If you know of a way to improve the procedure, let me know!



Seems fairly important to note that Enterprise Plus licensing is required to use this feature.